Friday, July 27, 2012

MEMBUAT HANDPHONE ANDA MENJADI AKSES POIN (WiFi)


JoikuSpot – Mobile WiFi HotSpot software for Nokia phones - N8, E7, C7, C6, N900, N97, E51, E52, E55, E71, E72, E75, N78, N79, N80, 5800 and many more phone models


Bagi anda yang mempunyai handphone 3G dan dilengkapi fasilitas kOneksi wifi, anda bisa membuat handpone anda tersebut menjadi akses poin atau WiFi.
1. Handphone 3G yang dilengkapi koneksi Wifi
2. Software Joikuspot light (gratis) atau Joikuspot Premium (berbayar).
Langkah-langkahnya:
1. Download software joikuspot sesuai dengan tipe handphone anda disini.

2. Install aplikasi tersebut pada handphone anda.
3. Setelah selesai menginstal, silahkan restart handphone anda.
4. Jalankan aplikasi joikuspot. 

5. Pada saat joikuspot dijalankan akan keluar alert : “Allow sharing your internet connection with external devices?” Jika anda menggunakan joikuspot premium, pilih NO.
6. Kemudian pilih options -> settings.
7. Lakukan settings sebagai berikut:
a) Pada Network name kita masukan nama sebagai nama akses point
b) Pada Access point kita isi dengan koneksi internet yang kita gunakan dalam ponsel (di sini saya gunakan Telkomsel)
c) Pada channel WiFi (802.11) kita isi dengan automatic (b/g)
d) Untuk bagian Encryption di sini ada 3 pilihan, None jika kita akan membuka sharring koneksi WiFi kita keluar, dan WEP open dan WEP shared jika kita ingin mengenkripsi koneksi kita dengan password tertentu (untuk contoh di sini saya pilih WEP shared, Encryption key type saya pilih ASCII, key length 64-bit, Encryption key-nya:12345).
e) Batterey threshold sendiri untuk menentukan penggunaan baterei dari ponsel, kalo dipilih makin ke kanan (full), otomatis baterei akan semakin boros, karena penggunaan betereinya dimaksimalkan.
f) Gateway IP address, berisi IP address dari ponsel kita yang menjadi akses point, untuk ponsel atau laptop yang menjadi client otomatis mendapatkan IP address berurutan dengan IP address akses point.
g) Untuk Factory settings sama dengan melakukan reset setting sesuai default dari aplikasi ini.
Setelah kita setting aplikasi ini, kita bisa mulai menggunakannya dengan memilih Start.
Kemudian, pilih jalur akses yang tersedia. Dan handphone anda akan langsung menjadi akses poin dengan settingan default.
Anda tidak bisa merubah settingan yang ada karena menggunakan Joikuspot yang gratisan…


Untuk melakukannya, ada beberapa hal yang harus disiapkan.

Jika anda menggunakan Joikuspot light, Pada saat joikuspot dijalankan akan keluar alert : “Allow sharing your internet connection with external devices?” pilih YES.
Selamat mencoba….
source : febrizal
Thursday, July 26, 2012

Free Online Document Translator - Preserves your document's layout (Word, PDF, Excel, Powerpoint, OpenOffice, text)

Free Online Document Translator - Preserves your document's layout (Word, PDF, Excel, Powerpoint, OpenOffice, text)

Ontrack Easy Recovery Professional Sofware Pengembali Data yang TerFormat di Hardisk Laptop / PC

Apakah Anda pernah secara tidak sengaja menghapus file Anda, kemudian sudah meng-empty recycle bin? Atau Anda telah mem-format hard disk tapi ingin data Anda kembali? Atau data hilang / rusak karena virus? Atau karena komputer mati atau restart tiba-tiba? Ada cara untuk mengembalikan data yang hilang, yaitu dengan satu software yang sangat lengkap, yaitu Ontrack Easy Recovery Professional
Inilah cara-cara mengembalikan data Anda yang hilang .  
Pertama Anda harus download dulu software tersebut, silakan klik di sini untuk download software Ontrack Easy Recovery Professional. Pilih External Mirror #1.

Jika data Anda yang hilang di drive C:, sebaiknya install di komputer atau sistem operasi lain. Jika data yang hilang di drive selain C:, Anda bisa menginstall software ini di mana saja di komputer yang sama, asalkan tidak berada salam satu drive dengan data yang hilang tadi.
Software ini menyediakan sebuah solusi yang sangat komplit sehubungan dengan data yang hilang atau urusan recovery data yang hilang karena:
  1. Virus.
  2. Sektor yang tidak terbaca
  3. Kesalahan aplikasi, system, atau shut down yang tidak normal.
  4. Kerusakan pada critical area.
  5. Ter-format
  6. Penyebab lain yang memungkinkan hilangnya data.
Software ini di-install pada Windows 98 SE, Me, 2000, or XP, dan dapat me-recover data untuk pada semua sistem windows. Software ini memiliki empat feature utama, yaitu:
  1. Disk Diagnostics, yaitu tool untuk mengecek kondisi hardisk Anda apakah masih bagus atau tidak.
  2. Data Recovery, yaitu tool untuk mengembalikan data / file karena terhapus, terformat, dan sebagainya.
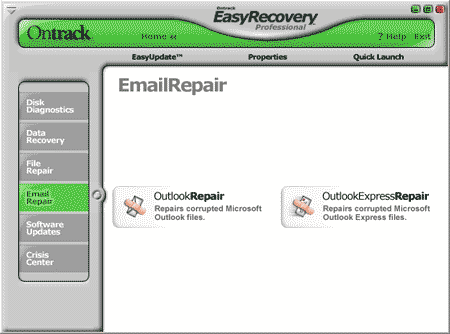
  3. Email Repair, yaitu tool untuk mengembalikan data email Outlook Express yang terhapus atau rusak.
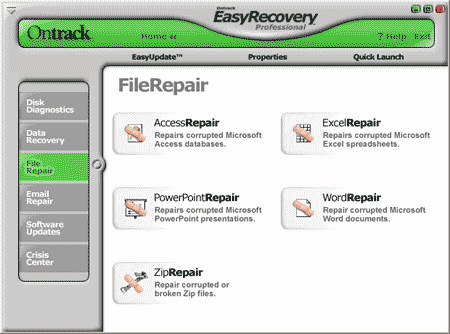
  4. File Repair, yaitu tool untuk memperbaiki data / file Microsoft Word, Excel, Access, PowerPoint, dan ZIP (winzip) file yang rusak karena virus atau sebab lain.
Mari kita lihat satu per satu fasilitas yang ada dalam software ini.
1. Disk Diagnostics
Data hilang - Disk Diagnostics

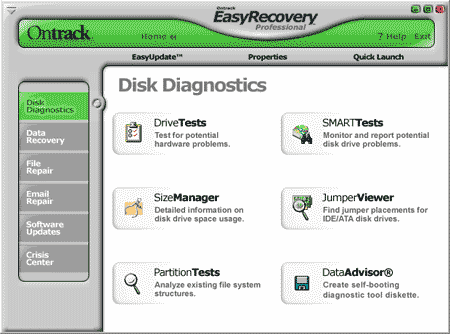
Tool yang ada dalam Disk Diagnostics ini adalah:
  • Data Advisor, untuk membuat disket recovery.
  • Drive Tests, untuk mengetes kondisi fisik dari hard disk (disk drive).
  • Jumper Viewer, untuk melihat posisi jumper pada hard disk.
  • Partition Tests, untuk mengecek kondisi partisi hardisk.
  • Size Manager, untuk melihat kapasitas hard disk
  • SMART Tests, digunakan untuk mengetes kondisi Self-Monitoring, Analysis and ReportingTechnology pada suatu hardisk.
2. Data Recovery
Data hilang - data recovery

Tool-tool yang ada dalam Data Recovery ini adalah:
  • Advanced Recovery, untuk mencari data yang sudah tidak dapat di-recover dengan tool lain, yaitu karena ter-format, ter-partisi, virus, atau hal lain.
  • Deleted Recovery, untuk mencari data yang sudah dihapus. Ini adalah tool yang paling sering dipakai penulis.
  • Format Recovery, untuk mencari data pada hard disk yang sudah di-format.
  • Raw Recovery, untuk mencari file yang hilang berdasarkan signature.
  • Resume Recovery, semua proses recovery dapat dihentikan sementara dan dilanjutkan pada lain waktu.
  • Emergency Media, untuk membuat disket atau CD yang digunakan untuk me-recover data / file hilang.
3. Email Repair, digunakan untuk mengembalikan data email Outlook dan Outlook Express yang hilang.
Data hilang - email repair

4. File Repair, digunakan untuk mengembalikan file-file Microsoft Office dan ZIP yang rusak. Tool ini dapat memperbaiki file Microsoft Word, Excel, Access, PowerPoint, dan ZIP (winzip) file yang corrupt / rusak karena virus atau sebab lain.

Data hilang - file repair

Data atau file yang hilang lebih sulit di-recover jika:
  1. Anda menambahkan file baru setelah Anda menghapus atau memformat hard disk.
  2. Anda menggunakan FAT32 dalam Windows XP.
Demikian cara mengembalikan data yang hilang dengan software EasyRecovery Professional. Semoga data Anda bisa diselamatkan.  

Sumber : tutorialgratis.net


Sunday, July 22, 2012

Disc Drop

Ini adalah permainan Disc Drop. Yaitu permainan menjatuhkan bola yang nantinya melalui beberapa rintangan titik, yang selanjutnya akan masuk ke lobang yang memiliki skor nilai... Disini diberi kesempatan 5 kali melepaskan bola. Permainan ini asyik saat senggang dari kejenuhan kita ON LINE. Dicoba ya...

Beri komentar sebagai masukkan blog..


Tuesday, July 17, 2012

Microsoft Windows XP Professional 32-bit en-US Black Edition 2012.1.15

Pada postingan kali ini saya berbagi OS Microsoft Windows XP Professional 32-bit en-US Black Edition. Semoga postingan ini dapat bermamfaat.


Microsoft Windows XP Professional 32-bit en-US Black Edition

For questions and bug reports go to www.zone54.com
You can support this project by making a donation or by clicking
1-4 times through the website and then on an 
Advertising Banner.
INFO (READ THIS)

General Info:

This is the original 
Microsoft Windows XP Professional SP3 32-bit (Volume License) ISO.
Prompt repair Unattended Installation with option.
This Windows XP is updatable out of the box and WGA Invalid CD-Key is already inserted and no 
Activation needed Windows XP and a WGA crack Will also be installed.
Includes all official and some unofficial 
Windows XP Service Pack 3 Updates till 10.1.2012.
Over 200 MB of integrated drivers for SATA / Achi, LAN, WLAN and Monitors.
A lot of Windows XP settings have already been set and Will also be set for new accounts created Windows XP.
Booting and Running a little bit faster Because some worthless Windows XP files and Programs are removed and all 
Windows XP Updates are slipstreamed.
After Windows XP installation is you can choose if you want the preconfigured Windows XP Settings and the Extra Programs to be Implemented, if nothing was chosen in 60 seconds then the option Yes Will be automatically selected.


Infortant Info: 
This Windows XP is not for upgrading you must make-a clean installation on a formatted hard disk drive or Partition.
It is possible to add Extra Programs and Custom Settings by editing the files in the directory "(source) \ OEM \ RunOnce" and the file "winnt.sif" in the directory "(source) \ I386". To do this you need to use a ISO Editor and all files Should Be opened with a text editor Such as Notepad.
If you are this installation of Windows XP on multiple Computers and want the full installation process to run automatically. Then you need use an ISO editor program and replace the file "winnt.sif" in the "(source) \ OEM" folder with the one That is in the "(source) \ I386" folder. If you now boot from the disc then your main hard disk drive is formatted and Will be Will be a new partition and then create Windows XP Will be automatically installed on this partition. Note That if you are Replacing the "winnt.sif" file then the Recovery Console and Repair Option That Will be disabled noramly You Could Be Run from the Windows XP Disc.
If the Windows XP installation hangs or you get a Blue Screen Error during the Windows XP installation Probably Because then this is due to a SATA driver problem. To fix this problem Should you do the steps under "Infos on how to Remove the included Drivers and include your own Drivers". If you are getting a Blue Screen error You Could also use a workaround for this by going into your BIOS and turn off the option SATA / Achi or change the SATA mode to IDE. Should this normally fix the Blue Screen error, But with this workaround you will from loss + / - 15% of your hard disk speed.

Infos for Newbies:

Minimum Computer Requirements he was a "600 MHz Processor" with a "256 MB of RAM" and "4 GB Hard disk drive" and a "Super VGA (800x600) Video Adapter".
If you miss some standard Windows XP programs then open the Windows XP Favorites folder and then you Will find alternative links to better programs. Some standard Windows XP programs are removed or outdated Because They are replaced by Microsoft with a better version, for example the free Microsoft Outlook Express That has been replaced years ago with the free Windows Live Mail program by Microsoft.
If you want to change the Windows XP CD-Key after the Windows XP has been installed then use the tool "Keyfinder (Key Changer) v1.51.exe" that you can find on the Optical Disc burned and in the ISO file. You can also change the Windows XP Owner and Company with this Tool.
If you get a malware warning about the files "Keyfinder (Key Changer) v1.51.exe" and "Windows Genuine Advantage Crack for v1.9.0042.0.exe", that's normal Because almost all Anti-Virus Programs are detecting Key Changers and Cracks as malware.
If you have a question or a problem then visit the Website "www.zone54.com", but first the make sure That you can not find the solution for your problem in 10 minutes over a Web Search Engine or over-the-forum search engine at "www.msfn.org".


INTEGRATED APPLICATIONS AND MORE.

Extras:

7 new Windows XP Themes: (ChaNinja Style v1.0 RC5), (Luna Element Black + CSS v5.1), (Windows 7 Colors v1.0), (Disney - It's a Magical World v1.0), (v1 BlackMesa .1), (NeoGeniX LS v1.0), (Royale Remixed v1.47).
Some new Web Links have been added to the Windows XP Favorites folder.
Windows XP Key Changer (Keyfinder v1.51) and a text file with a working WGA Keys.

Patches:

TCP / IP Patch: Allows you to have 16777214 (Max) Half-Open TCP Connections instead of 10.
Uxtheme Patch: Allows you to use un-signed custom visual styles.
SFC Patch: Allows you to disable and enable Windows File Protection with a registry key.
RAID-5 Patch: This Will Enable Software RAID-5 support.

Tweaks:

Suppressing the Microsoft Update nagging to install Windows Genuine Advantage Notifications v1.9.40.0 (KB905474).
Suppressing the Microsoft Update nagging to install Windows Malicious Software Removal Tool v4.4.5802 (KB890830).

Driver Packs:

MassStorage v11.11 - Supported Device list at: http://driverpacks.net/driverpacks/w...-storage/11.11
LAN v11.11 - Supported Device list at: http://driverpacks.net/driverpacks/w.../x86/lan/11.11
WLAN v11.09 - Supported Device list at: http://driverpacks.net/driverpacks/w...x86/wlan/11.09
Monitors v10.05 - Supported Device list at: http://driverpacks.net/driverpacks/w...monitors/10.05

Windows XP Service Pack 3 Updates:

Windows XP Service Pack 3 (KB936929).
Windows Internet Explorer 8.
Windows Media Player 11.
Microsoft European Union Expansion Font Update v1.2.
Microsoft XML Core Services v4.0 Service Pack 3 (KB973685).
Windows XP Root Certificates Update (KB931125) Version November 2011.
CAPICOM v2102 Windows XP.
Microsoft Windows Update Web Control 7.4.7600.243.
Microsoft Update Catalog Web Control 7.4.7057.248.

New Microsoft Windows XP Service Pack 3 Applications:

Windows XP PowerToy - ClearType Tuner v1.01.
Windows XP PowerToy - Alt-Tab Replacement v1.0.
Windows User Profile Hive Cleanup Service v1.6g.
Microsoft's BitLocker To Go Reader v1.0 (KB970401).
Windows Feature Pack for Storage v1.0 (KB952013).
Windows XP exFAT file system driver update package v1.0 (KB955704).
Windows XP GDI + Detection Tool v1 (KB873374).
QFEcheck v6.2.29.0 Windows XP.
Microsoft Windows Browser Choice (KB976002 v5).
Windows Genuine Advantage Validation v1.9.42.0 (KB892130) - Cracked Version.

Other Applications:

7-Zip v9.20.
Open Command Prompt Shell Extension v2.1.0.
HashCheck Shell Extension v2.1.11.
SumatraPDF v1.9.
Unlocker v1.9.1.
Virtual CloneDrive v5.4.5.0.

Runtimes:

Java SE Runtime Environment (JRE) v7 Update 2.
Flash Player ActiveX Control v11.1.102.55.
Microsoft Silverlight v5.0.61118.0.
Microsoft DirectX v9.29.1962.
Microsoft Visual C-family (Up-to-Date) v1, v2, v3, v4, v5, v6, v7, v8, v9, v10.
Microsoft Visual Basic (Up-to-Date) v1, v2, v3, v4, v5, v6, v7 +.

REMOVED WINDOWS XP COMPONENTS.

* Applications: Address Book
* Multimedia: Images and Backgrounds, Movie Maker, Music Samples, Old CDPlayer and Sound Recorder.
* Network: Communication tools, MSN Explorer, Netmeeting, Outlook Express, Windows Messenger.
* Operating System Options: Blaster / Nachi removal tool, Desktop Cleanup Wizard, Out of Box Experience (OOBE), Tour, Zip Folders.
* Drivers: Display adapters, IBM ThinkPad, Logitech wingman, Microsoft Sidewinder, Scanners, Serial Pen Tablet, Sony Jog Dial, Toshiba DVD decoder card.
* Files: clock.avi, swtchbrd.bmp, yahoo.bmp.
* Folders: "DOCS", "DOTNETFX", "SUPPORT", "VALUEADD", "I386 \ WIN9XMIG", "I386 \ WIN9XUPG".
* Nothing has been removed System That Could Cause any Problems or any Problems with other Software Applications.

HELP GUIDES.

Infos on how to Remove the included Drivers and Drivers include you own:

1. Download the drivers for your SATA Controller That Is in your computer and then the make a new folder and extract all the files with a Zip program like 7-Zip into the new folder (If there is no file "txtsetup.oem" in the Zip file That you downloaded then use google to find the SATA Drivers That has included this file Because this Will not work without this file).
2. Make a new folder on your hard disk drive and name it "WINXPCD".
3. Open the ISO file "Windows XP Professional 32-bit en-US - Black Edition v201X.XX.XX.iso" with a Zip program like 7-Zip and extract all the files into the folder "WINXPCD".
4. If you see a folder "[BOOT]" in the "WINXPCD" folder then delete it.
5. Now go to the directory "WINXPCD \ OEM" and run the file "driverpacks BASE - vX.X.cmd Remover".
6. Download and install the program nLite from "http://www.nliteos.com/download.html".
7. Start the program and click Next and Browse to the folder "WINXPCD" and after the loading is done click two time on Next and then select the option "Drivers" and the option "Bootable ISO only" and then click Next.
8. Now Click on "Insert" and then choose "Multiple driver folder" and Browse to your folder where your 32-bit SATA Drivers are and then click OK.
9. Now Select the Appropriate drivers for Windows XP 32-bit and then click OK and then choose "textmode driver" and select all options in the Box "textmode integration options" and then click OK and then click Next and then click Yes and if the integration is finished click Next.
10. At the Option "Label" write "WinXP_32-bit_BE" or whatever you want (Maximum 16 characters) and then click "Make ISO" and then Browse to the location where you want to save the new Windows XP ISO file and you done.
* To test if the ISO file with the new integrated SATA / AHCI drivers are also working on your Computer you need to install the program VirtualBox from "www.virtualbox.org". It is Important That you set in the VirtualBox Virtual Hard disk to SATA not IDE or Will the test be useless.
* If you have a problem to include your SATA into your Windows XP then visite the MSFN forum at "www.msfn.org / board / index.php" and post the topic about the problem you have. But first the make sure That you can not find the solution for your problem in 10 minutes over a Web search engine or search engines over the forum before posting a new topic in the forum.

Infos on how to install Windows XP from an USB flash drive:

* First Make sure That your Computer (motherboard) is also supporting USB Booting, if you can not find any option like this in your BIOS then your computer (motherboard) is not supporting this so an installation of Windows XP from a USB Flash drive Will not work.
1. Make a new folder on your hard disk drive and name it "WINXPCD".
2. Open the ISO file "Windows XP Professional 32-bit en-US - Black Edition v201X.XX.XX.iso" with a Zip program like 7-Zip and extract all the files into the folder "WINXPCD".
3. If you see a folder "[BOOT]" in the "WINXPCD" folder then delete it.
4. Now download the program WinToFlash at "www.wintoflash.com/home/en/" and install it.
5. Start the WinToFlash Program and now the Wizard Will help you to do the rest, but note That only the "Windows files path:" is the "WINXPCD" folder you created and the "USB drives" is the USB flash drive connected That Is to the Computer.
6. If you done then restart your computer and press the key to enter the "Boot Menu Option" and select the USB Device That has the Windows XP on it. If the computer starts and there is no key to enter the "Boot Menu Option" then press the key for the for the "BIOS Settings Menu" and set the Boot Priority for the USB device is above the hard disk drive and then select save and exit .
* If you have a problem installting Windows XP from an USB Flash drive WinToFlash then visite the forum at "www.wintoflash.com / forum / index.php" and post a topic about your problem. But first the make sure That you can not find the solution for your problem over the forum search engine before posting a new topic in the forum.

Infos on how to install Windows XP new:

1. FIRST BACKUP YOUR FILES ON A CD / DVD OR TO DRIVE AN HARDDISK and download all the Up-to-Date Drivers That you need for your Computer from the "Chip Cards" manufacturer Websites.
2. Go to your Motherboard or Computer manufacturer site and look if there's no a new BIOS update for your mainboard (You can skip this but it is always better to have an bug free BIOS).
3. Select in your Burn program the option for Burning an Image file and then select the file "Windows XP Professional 32-bit en-US - Black Edition v201X.XX.XX.iso" and then Burn the disc at a low speed like 4x to avoid missing files errors if you install the Windows XP. If you need a good Burn Program i recommend the free ImgBurn program at "www.imgburn.com".
4. Insert your Windows XP Disc burned in your Optical Disc Drive and then restart your Computer. If your Computer starts Should you see the message "Press any Key to boot from the CD." if you see this then press a random key on your keyboard. If you do not see this message then you need go into your "BIOS Settings Menu" and set the Boot Priority for the Optical Disc drive above the hard disk drive.
6. If Windows XP has the drivers loaded on your keyboard then press the key "ENTER" key and then press the "F8" key and then press the "ESC".
7. Now select the hard disk drive where you want to install Windows XP (Default is "C:") and then press on your keyboard is the Key "D" and then press the key "ENTER" and then press the key "L".
8. Now select the same hard disk drive again (Default is "C:") and press on your keyboard the key "ENTER" and then you Should select the option "Format the partition using the NTFS file system (Quick)" and then press the key "ENTER".
9. After the Windows XP installation is finished you need to install all the Up-to-Date Drivers for your Computer and then your DONE. :-)
* If you get corrupted file error (s) or missing file error (s) During your Windows XP installation Should you then try this:
1. Burn the Disc at the lowest possible speed.
2. Do not use old scratched Discs.
3. Try to clean your optical disc drives.
4. Use another optical disc drive to install Windows XP.
5. Try to install Windows XP from a USB flash drive.

15.01.2012 Changelog:

* Changed the Windows XP update option to automatically download and install the Windows XP updates.
* Re-added the default Microsoft IIS (To Ensure compatibility with some Microsoft products).
* Re-added the default Microsoft FrontPage Extensions (To Ensure compatibility with some Microsoft products).
* Re-added the default Microsoft Paint.
* Removed Paint.NET.
* Removed Microsoft. NET Framework All-in-One installer (There Could be Some updates conflict with the custom installer a re-installation of Microsoft. NET Framework fixed this but this is an annoying problem).
* Updated tweak "suppressing the Microsoft Update nagging to install the Windows Malicious Software Removal Tool (KB890830)" from "v4.3.5701" to "v4.4.5802".
* Integrated all Windows XP Service Pack 3 Updates form 22.12.2011 till 10.01.2012.


Remember its guidance:
Download each part
Place each part in the same folder
Rename the original name (beware here, do not get confused when there are parts to rename)
Extract the contents of the file with winrar, when prompted for a password, type (not in Copas) manually
If the message occurs during the extraction process wrong password, it means that in the third process (when rename each part, you have that mixed up), extracts of which appeared as if bad sectors, use the record function in winrar recovery, because every windows xp on this blog has recovery record 10%
If Not The form Image File (. Iso) Previously Created File imagenya (Can be with Software Various Kinds, for example: PowerISO, UltraISO, etc.).
Burn using the appropriate burner software (take on the lowest speed CD burning process)

Burn to CD-R media (not recommended to use CD-RW, DVD-R, DVD-RW, and CD-R Media Use Good Quality, for example: CD-R Of V * er * a * team, Not In Pula Suggest to -Install Windows It With Flash Disk, If Using Media Failure Occurs In addition to the Suggest Above, So I'm Not Able to Provide Alternative Solutions In addition to CD-R Media Using Good Quality).

The process is managed correctly, then the windows installer ready to be used as the initial bios to boot from your computer / laptop is powered on
When you want to format computer Forgot To Janggan its Setting Boot From CD-ROM
Perform the Install Windows In accordance with Directive
Do not Forget To Install Drivers Graphics & Sounds of Graphics Card you Have and motherboard.
Starting in October 2011, File No Split Again With HJ Split
START MONTH DECEMBER 2011 onwards, FILE NOT IN WINDOWS 95 MB PER SPLIT, BUT AS OF 500 MB, WHEREAS IDWS MEMBER CAN UPLOAD MAXIMUM UPLOAD 500 MB IN THE PORTAL (MORE SO SIMPLE AND GOOD DOWNLOAD HIS, and minimize the Corrupt WHEN UPLOAD & DOWNLOAD & EXTRACT - ENJOY!)
In WinRar Recovery Record: 10%
WinRar Password: carlos_roy_fajarta@idws
Serial Number: No Serial Number Needed
Notes: Windows is already in the form of ISO 

Download Microsoft Windows XP Professional 32-bit en-US Black Edition 2012.1.15
Part1
Part2

Sunday, July 15, 2012

Menampilkan button follow twitter pada blog anda


Kali ini saya akan memposting "Menampilkan Button Follow Twitter di Blog Blogger". Trik ini bagi yang terbiasa utak atik blog sudah tidak asing lagi, tapi bagi yang pemula mungkin masih bingung. disini saya akan memberikan triknya dengan langkah-langkah yang lebih mudah untuk dipahami.
Langsung aja yach.. tapi sebelum mulai siapkan dulu kopi dan makanan ringan (geguduh atau selimpok) itu ada di LIWA.

1. Buka account twitter anda
2. setting
3. edit your profile >> profile
4. klik You can also add Twitter to your site here 
5. klik button >> atur pada twitter buttons
6. copy  kode HTML >>


7. Login blog anda (www.blogger.com
8. klik design 
9. klik layout >> add a gadget >>


10. Pilih  HTML/JavaScript >>  isi title, pada kolom content paste kode HTML

11. klik save
12. atur posisi pada layout >> save arrangement
13. View Blog.


Selesai deh.. Mudah kan.

Saturday, July 14, 2012

Sepanjang Hidup By Maher Zein


Sepanjang Hidup
aku bersyukur kau di sini kasih
di kalbuku mengiringi
dan padamu ingin ku sampaikan
kau cahaya hati
dulu ku palingkan diri dari cinta
hingga kau hadir membasuh segalanya
oh inilah janjiku kepadamu
sepanjang hidup bersamamu
kesetiaanku tulus untukmu
hingga akhir waktu kaulah cintaku cintaku
sepanjang hidup seiring waktu
aku bersyukur atas hadirmu
kini dan selamanya aku milikmu
yakini hatiku
kau anugerah Sang Maha Rahim
semoga Allah berkahi kita
kekasih penguat jiwaku
berdoa kau dan aku di Jannah
ku temukan kekuatanku di sisimu
kau hadir sempurnakan seluruh hidupku
oh inilah janjiku kepadamu
sepanjang hidup bersamamu
kesetiaanku tulus untukmu
hingga akhir waktu kaulah cintaku cintaku
sepanjang hidup seiring waktu
aku bersyukur atas hadirmu
kini dan selamanya aku milikmu
yakini hatiku
bersamamu ku sadari inilah cinta
tiada ragu dengarkanlah
kidung cintaku yang abadi
Lyrics:
Maher Zain
Novia Stephani
Bara Kherigi
Charbel Amso
Abou-Danniel

Friday, July 13, 2012

Memasang Widget Yahoo Messenger di Blog


Ada banyak cara untuk mempercantik dan melengkapi fasilitas dari blog yang kita miliki, salah satunya adalah dengan memasukkan YM atau Yahoo Messenger ke dalam blog kita miliki. Ikon YM yang sedang menunjukkan bahwa ID Yahoo tersebut dalam keadaan online dan siap untuk diajak chat. Sehingga nantinya widget YM yang dipasang di blog berguna untuk berkomunikasi real time antara pembaca dengan pemilik blog.


Untuk memasang widget Yahoo Messenger di blog ikuti langkah berikut ini:
  1. Login ke akun blogger milik sobat.
  2. Klik Design. Kemudian klik Lay out >> Pilih add widget.
  3. Pilih HTML/Javascript


    4. Copy paste kode HTML dibawah ini:

<a href="ymsgr:sendIM?ID YM ANDA"> <img src="http://opi.yahoo.com/online?u=ID YM ANDA&amp;m=g&amp;t=2&amp;l=us"/>
</a>


Keterangan :
  • Ganti warna merah dengan ID YM ANDA
  • Untuk warna kuning itu adalah tampilan Ikon YM ada beberapa style ID yang bisa anda gunakan . Berikut tampilan ikon YM yang bisa anda gunakan .


      5.  Kemudian Simpan (save)
      6.  View Blog

Selesai deh... selamat mencoba, dan beri komentarnya dong....

Flash Disk Pengganti CD Install Windows

 
Install Windows Pake Flashdisk
Tips & Trik Notebook
Keberadaan laptop mungil atau netbook tengah menawan hati sebagian besar pengguna komputer jinjing. Bagaimana tidak? Walaupun terkadang spesifikasi sebuah netbook tidak semumpuni notebook-notebook berukuran lebih besar, ukurannya yang mini dan kemampuannya yang dapat mengakomodasi kebutuhan berkomputer sehari-hari menjadikan subnotebook sebagai salah satu gadget yang sangat diminati, disamping harganya yang lebih terjangkau, tentu saja.

Nah, salah satu usaha produsen subnotebook untuk "merampingkan" produknya adalah dengan meniadakan perangkat optical drive, seperti CD-ROM/RW atau DVD-ROM/RW. Komponen yang digunakan untuk mengakses keping CD atau DVD ini memang cukup menyita ruang dan sumber daya.

Sebagai konsekuensinya, pemilik subnotebook tak dapat mengakses CD atau DVD di subnotebook-nya, atau terpaksa membeli external optical drive yang tetap dijalankan via port USB yang tersedia.

Lewat artikel ini penulis ingin berbagi tips membuat modul instalasi Windows XP menggunakan media USB flash disk, yang tentunya akan menghemat biaya dan menjadikan pembaca lebih pintar. Modul instalasi ini tak hanya dapat diimplementasikan dalam instalasi ke subnotebook saja, tapi juga dapat diaplikasikan pada komputer mana pun yang sudah memiliki fitur untuk booting via USB.

"Gampang! Tinggal salin file instalasi Windows XP ke flash disk!" Mungkin itu yang terlintas di benak Anda, tapi percayalah bahwa membuat modul instalasi Windows XP tidak semudah itu. Namun jangan khawatir, karena dengan mengikuti langkah-langkah berikut, proses pembuatan modul instalasi Windows XP pun tak terlalu sulit dilakukan.
Dengan perkembangan teknologi flash disk sekarang yang memiliki kapasitas semakin besar maka kita dengan mudah bisa menggunakan flash disk untuk menginstall windows , berikut syarat2 yang harus di persiapkan .
1. Flash disk apa aja ( kalau bisa minimal 1GB ).
2. komputer korban ( victim )
3. komputer master , lengkap dengan cd-rom tentunya ( untuk membuat master flash disk )
4. cd windows xp ( asli atau palsu terserah )
5. program untuk modul installasi
- USB_PREP8 ( download via indowebster)
- PEtoUSB  ( download via indowebster)
setelah pernah pernik diatas sudah siap maka langkah selanjutnya memulai installasi windows xp dari flash disk :
Langkah-langkahnya sebagai berikut :
1. Colok flash disk ke komputer master dan catat posisi drivenya , apakah di F:, G:, H:, O: dan sebagainya
2. extrak file2 yang diatas , USB_PREP8 dan PEtoUSB kedalam satu folder  misalkan  C:/usb ( hasil extrak file USB_PREP8 jadi 1 folder, copy smua file dah pindahkan ke folder C:/usb) demikian juga file PEtoUSB.
3. Siapkan cd instalan windows xp dan masukkan ke cd rom komputer master .
4. selanjutnya buka folder C:\USB yang sudah dibuat dan berisi file2 tersebut diatas.
5. Selanjutnya jalankan file bernama usb_prep8.bat lalu akan muncul sebuah windows command prompt berisi bermacam2 perintah, tekan sembarang tombol aja di keyboard.
6. selanjutnya di layar komputer kamu akan muncul program PEtoUSB yang meminta untuk memformat flash disk kamu , klik start aja langsung.
7. Jika proses format sudah selesai, tutup program PEtoUSB ( jangan tutup windows command prompt usb_prep8.bat ) di layar akan muncul opsi-opsi dari 0 hingga 5.
8. Selanjutnya pilih opsi ke 1 untuk memilih sumber file installasi windows ( pilih drive cd rom kamu aja yang berisi cd installan windows ) atau juga bisa folder yang berisi file2 source instalasi windows.
9. Setelah diatas , akan diminta lagi memilih opsi dan pilih opsi ke 3 untuk mentukan dimana kamu mencolokkan flash disk kamu, kalau di drive E maka ketik e dan tekan enter.
10. Setelah tahap ini pilihlah opsi 4 untuk memulai proses pembuatan modul instalasi yang nantinya akan disalin ke flash disk secara otomatis. Jawab apa pun konfirmasi yang muncul dengan Y atau YES atau OK atau bentuk persetujuan lain. dalam proses ini akan memakan waktu yang cukup lama, proses pembuatan modul instalasi / pengcopyan file ke flash disk kamu ( mungkin lebih dari 15 menit )
yang sabar aja, setelah selesai sekarang kamu sudah memiliki flash disk yang bootable dan mampu menginstall windows secara langsung.
11. Cabutlah flash disk dari komputer master lalu colokkan ke komputer victim untuk memulai installasi, bootlah komputer kamu dari flash disk .
12. Lalu dilayar akan muncul 2 opsi penginstallan, pilihlah opsi yang kedua dan proses penginstalan windows akan mulai berjalan.
Semoga Sukses

Sumber : FILZA COMPUTER MALANG